Navigating the aims and practices of the Jira permission maze

Jira permissions can be a daunting task. New Jira administrators will try to apply a strict group-based permission scheme, which can work if there are few projects and a limited user base. But once you have different groups of users requiring access to distinct projects between evolving requirements, Jira admins spend more time managing groups and users than ensuring Jira is working as intended.
This is where project roles come into play; a Jira admin's best friend. They can free up time and stop unnecessary questions aimed at the Jira administrator. In this blog, we’ll describe how we set up project roles and permission schemes, saving Jira admins hassle when providing users with project access.
Your organization may want to take a different approach
Large or heavily regulated organizations often tend to do things differently, if not the opposite. Organizations may have a centralized place to order services, request access to resources, or have some demand that a governing body regulates access to projects. In these cases, controlling project access via groups might be better, and having a centralized place in your active directory to manage who can access what.
Remember: This will bloat how many groups are in your Atlassian environment and make managing jira more difficult.
Explanation of the different parts
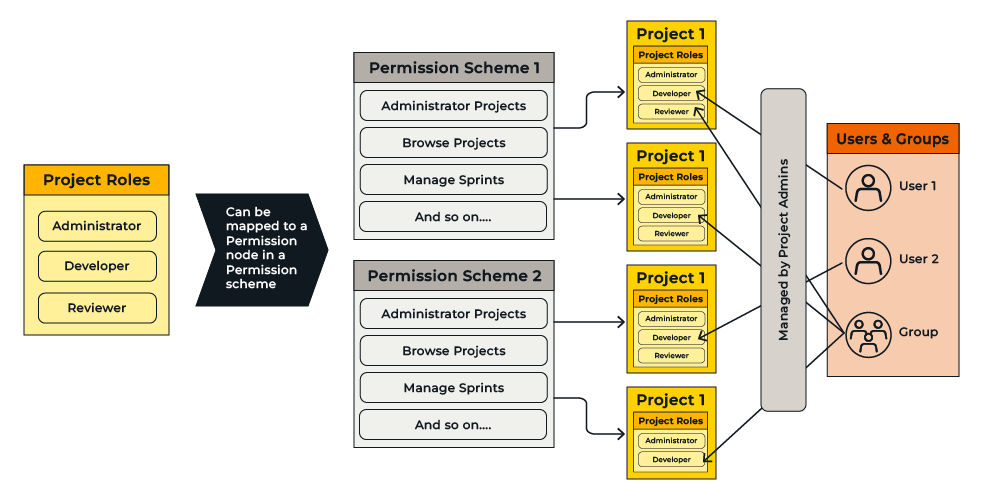
There are three moving parts when setting up permissions “the right way”. We have permission nodes, permissions schemes, and project roles. Within a permission scheme, various permissions can be configured. In this case, we will use the exact wording “That Jira Guy” uses and call each of these for a permission node.
Permission nodes
A permission node is the individual permissions available within a permission scheme. The list is extensive, and explaining it requires another article, which is why “That Jira Guy” has done exactly that!
Permission schemes
We all know and “love” permission schemes. Projects use them to grant granulated access, but setting them up can be tricky. You must understand what the different permission nodes do and how they interact with the project.
Permission nodes are the building blocks determining what users can do in a project. On the other hand, a permission scheme is a collection of permission nodes that can be applied to a project.
Project roles
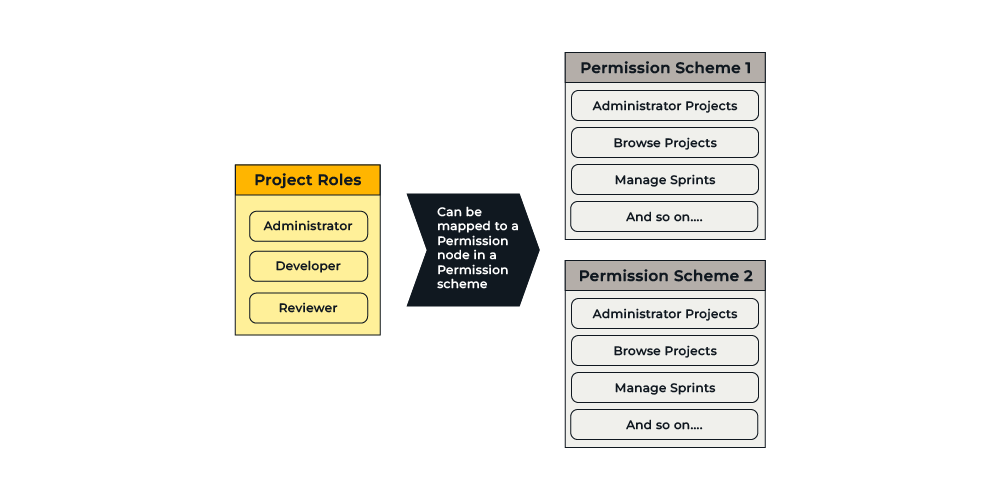
They are the roles you can assign to users or groups in a project. But what isn’t apparent is that project roles can be granted permissions to a permission node within a permission scheme. Seeing how project admins can give users roles in a project, you can probably see where we’re going with this!
The bigger picture
Note: The images below are based on graphics in Atlassian’s article on Best Practices: Restricting Projects in Jira.
Now, while this may seem a bit complicated at first, it's easy to understand by breaking it down step by step.
What do I use project roles for?
In this case, we will map project roles to permission nodes in a permission scheme. This ensures we can reuse a project role in multiple projects without affecting areas users haven’t been given permissions.
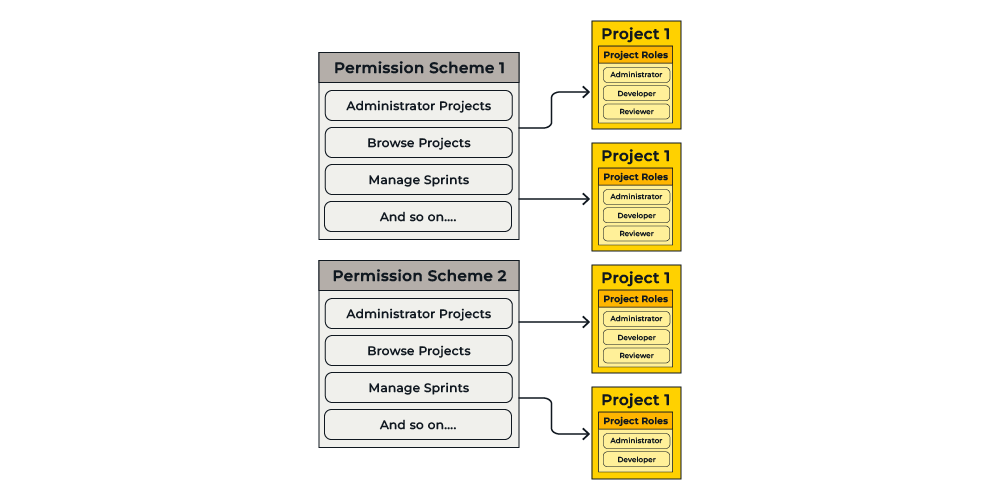
How are permission schemes mapped to projects?
We can apply the same permission scheme to multiple projects without muddying the waters with users because users are assigned project roles on a per-project basis instead of globally.
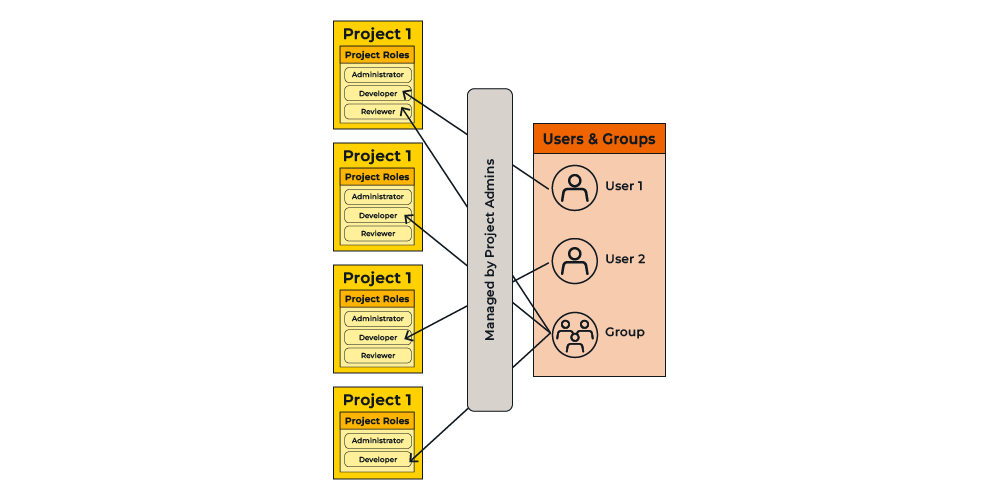
Providing users with access
This is the fun part, where the Jira administrators can lean back and let the project admins do the heavy lifting by adding users to a project's “people” section and mapping them to project roles.
Here's an example
The setup:
Visible projects (Both the project name and a key)
- “CheeseWhizzes” - CWZ
- “MoldBreakers” - MDB
- “CurdYourEnthusiasm” - CYE
Hidden project
- “CheeseQuest” - CHQ
- “WheyToGo” - WTG
Users (including roles in the company)
- Alex - Project Admin in all visible projects
- Brian - Project admin in WheyToGo
- Hansi - Project admin in CheeseQuest
- Bo - Developer in all visible projects
- Jan - Developer in CheeseQuest and WheyToGo
Permission schemes - We’re cutting unnecessary information out
- “Open permission scheme” - Everyone in the company can see projects. Only users with the “Developer” project role can work with the project.
- “Hidden permission scheme” - Only people who have been assigned project roles can see issues in the project
Project roles
- Administrators
- Developers
The issue:
You have a setup where almost all projects are open, and everyone can work with them save for two projects. The project administrator, Brian, has contacted you and needs you to ensure Bo can see and link issues from “CurdYourEntuhsiasm” to “WheyToGo”. Bo shouldn’t be able to do anything besides see issues in “WheyToGo” and link issues. Access to “WheyToGo” should also remain restricted for other users who don’t currently have access.
The current situation:
Our first job as a Jira administrator is to see if this request is practical to implement within the current setup. Can it be done? Will it mess something else up in the process? Will this be an issue for other projects that use the permission scheme we need to change?
In this case, we can see that both the project “WheyToGo” and “CheeseQuest” uses the “Hidden Permission Scheme”. So, changes to this scheme will affect both projects.
The user, Bo, has access to “CurdYourEntuhsiasm” via the role “Developer”, and “CurdYourEntuhsiasm” has the “Default Permission scheme” applied.
We’ve spoken with the project administrator for “CheeseQuest” and decided that changes to the permission scheme will be fine, and he is aware of said changes. We can see that our changes will not impact anything else negatively, so we formulate a plan:
- Create a new project role: Linker
- Modify the permission scheme, “Hidden Permission scheme” adding the following permissions to the new project role, Linker.
- Browse Project
- Link Issues
- Inform the Project Administrator (Brian) that he can add the user (Bo) to the hidden project “WheyToGo” with the Linker role.
- Inform other project administrators who use the “Hidden Permission scheme” that if they give users the Linker project role, they can see and link issues in their projects to other projects.
So, how does all this look over on the administration side?
Administrator tasks:
The administrator would start by going to “Settings ⚙️ -> System -> Project roles” and creating a new Linker role:
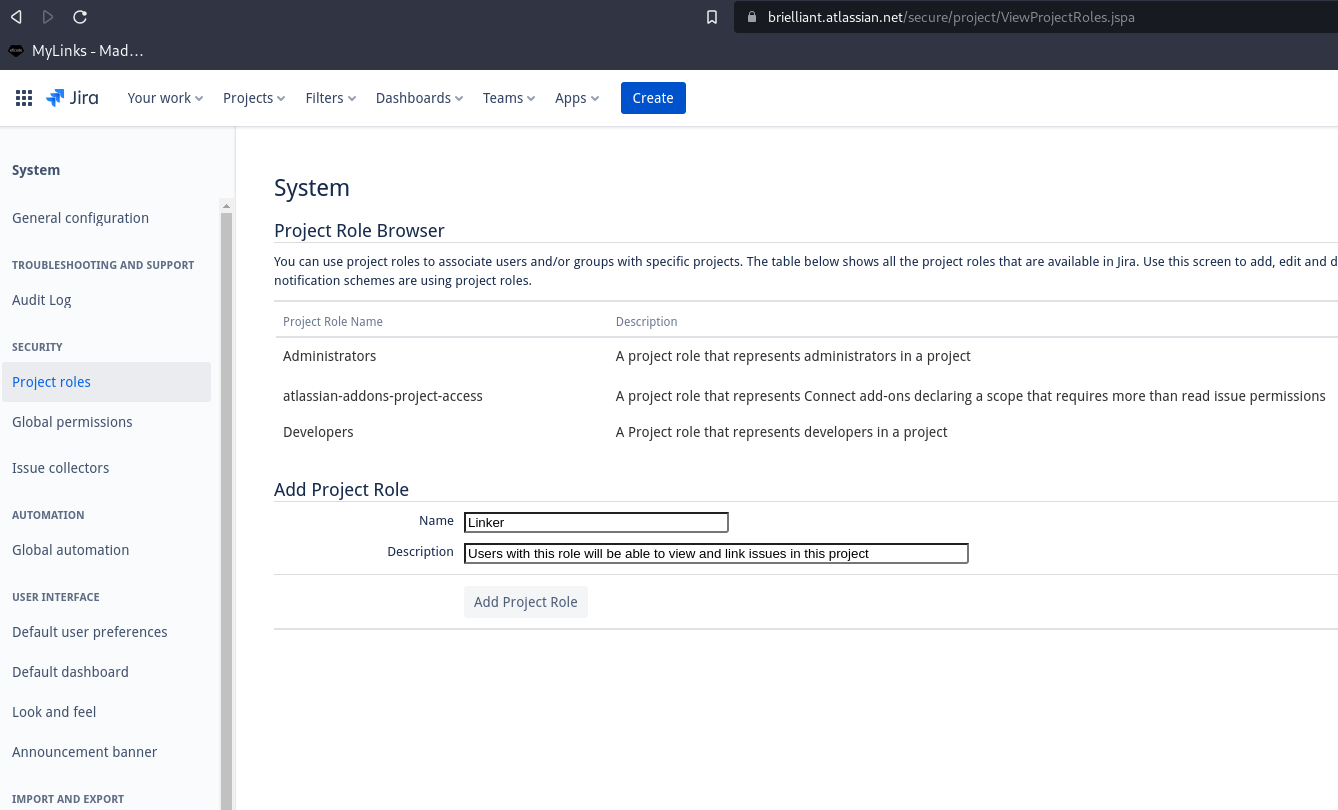
We can afford to be descriptive, seeing that only Jira administrators can assign this role to a permission scheme. So, there should be control over how these roles are used,
After this, we will go to: “Settings ⚙️ -> Issues -> Permission schemes” find the “Hidden Permission scheme” and select “Permissions.”

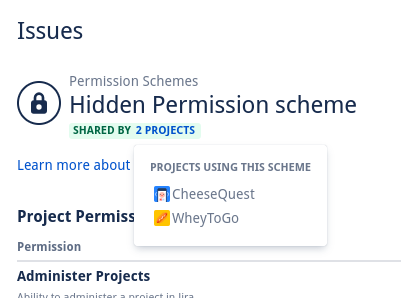
Inside the “Hidden Permission scheme,” we can see that it is shared with two projects, “WheyToGo” and “CheeseQuest.”
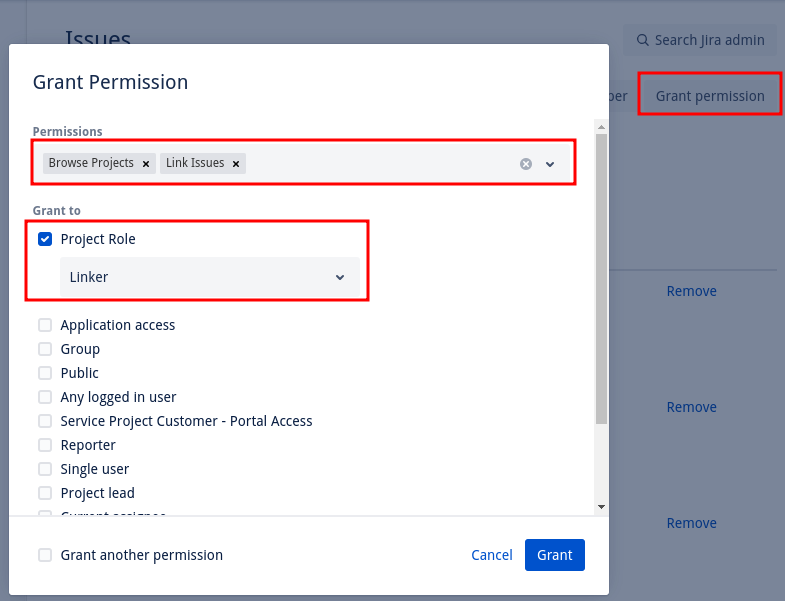
From here, we click “Grant permission” at the top right and add the permission nodes “Browse Projects” And “Link Issues.” After that, we grant these permissions to the new project role, “Linker.”
Lastly, we need to inform Brian that he can now grant Linker permissions to the user, Bo. Bo can then link to issues in “WheyToGo” from all other projects where he has the same permissions. We also need to inform Hansi the Linker role is available to him.
An email is sent to the project administrators worded like this:
Dear Jira Project Admins,
I am writing to inform you that we have recently added a new role called "Linker" in Jira. This role lets people see all problems in the project and connect them to other issues. Please note that this role has only been added to the Hidden Permission Scheme.
Keep in mind that the Linker role only grants specific permissions. Users with this role won't be able to work normally on the project. We recommend using this role only when necessary and only to users who require the permissions it grants.
If you need clarification on Hidden Permission Scheme or Linker role, contact us with any questions or worries.
Thank you for your attention.
Best regards,
[Your Name]
Jira Administrator
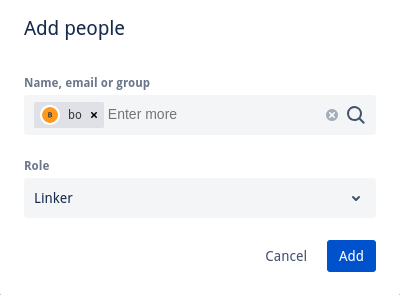
Now that the ball is in Brian's court, we'll need to add Bo to the project “WheyToGo.”
Brian will have to go to “Project Settings” within “WheyToGo” and then go to “People.” From here, he will have to add Bo as a Linker by selecting “Add People.”
Bo will now have permission to see and link to all projects in “WheyToGo.” This way, he can link an issue from “CurdYourEnthusiasm” to block an issue in “WheyToGo.”
Takeaways
Jira’s permission schemes are extensive. You only have VERY fine-grained options when it comes to how you set up permissions for them. At the same time, you can delegate the job of providing permissions away from the Jira administrator to the project administrators. This makes the process easier for both the users and project administrators.
Suppose you don’t try to limit the number of permission schemes (or schemes in general). It can quickly become overwhelming, and the overview of your Jira Instance can disappear in yet another scheme.
When a request comes in from users, project admins, or other Jira administrators, you must be vigilant in asking questions. Is it needed? Can a similar option be used? How can I reuse already existing options?
Say that a project admin wants a new Issue type. You already have one called “Waiting”, but the project admin wants a new issue type called “Waiting external”. Try to find out if there's a business case for this or if the project needs this new issue type. What does it solve that the current issue type doesn’t?
You can also look at our example above as a reference (where a new project that provides read access to everyone needs to be created, but work inside it needs to be restricted). Create a role with browse permissions instead of creating a new permission scheme. Then, add a group with all users to the new role in the project where you need it.
This way, we limit the number of permission schemes and give the power to the project admin to administer their projects as they want.
Published:
Updated: