Custom DNS on GKE

Are you also having trouble reconfiguring the requests and limits of KubeDNS in your managed cluster? Or curious about DNS in Kubernetes or the Addon Manager reconciling your resources? Either way you’ll be in good company, as I explain their respective roles and how I finally managed to redeploy KubeDNS and even CoreDNS as well!
A tiny backstory
What? KubeDNS is an application that runs in your cluster. It allows you to access other resources in your cluster by using DNS!
… What? It means that you don’t have to guess the 10.0.x.y IP your MySQL pod is going to receive when it’s created! Instead you can expose it as a service called mysql and access it on the well defined address mysql.<namespace>.svc.cluster.local.
Taken from the Debugging DNS Resolution task on Kubernetes.io, let’s see this in action.
First I create a busybox pod in my cluster:
$ kubectl create -f https://k8s.io/examples/admin/dns/busybox.yaml
pod/busybox created
And subsequently use it to do an nslookup on a DNS name in my cluster:
$ kubectl exec -ti busybox -- nslookup kubernetes.default

Server:    10.23.240.10
Address 1: 10.23.240.10 kube-dns.kube-system.svc.cluster.local
Name:      kubernetes.default
Address 1: 10.23.240.1 kubernetes.default.svc.cluster.local
When I run the nslookup on the kubernetes service, it’s correctly resolved to the cluster-ip. We can verify this by looking at the services and see that the cluster-ip matches, like below:
$ kubectl get service

NAME         TYPE        CLUSTER-IP    EXTERNAL-IP   PORT(S)   AGE

kubernetes   ClusterIP   10.23.240.1   <none>        443/TCP   25m
Cool!.. How?
KubeDNS runs as a deployment in your cluster. It’s exposed by a service called kube-dns with a predefined cluster-ip (in my case) 10.23.240.10. GKE passes the ip to the kubelet on each node and the kubelet passes it to the containers it launches. The containers can then send their traffic to this ip to reach the kube-dns service. The service passes the traffic to one of the KubeDNS pods which routes it to the proper destination.
Reconfiguring the default resource requests and limits of KubeDNS
An aptly named concept of Kubernetes that allows for more intelligent scheduling of pods is resource “Requests” and “Limits”. Used for Quality of Service (QoS), if you configure them correctly Kubernetes won’t evict your pods when resources become scarce. QoS thus enables you to put more stress on your cluster without losing important workloads.
I was running a small cluster with tiny workloads and I started running out of free resources. I wasn’t overutilizing my nodes, but it looked like that and Kubernetes refused to schedule pods. Turns out it was the requests of the running pods that had all my resources reserved. An obvious solution is to add more nodes, but as evident from the picture below, my cluster was completely underutilized. Thus I started looking into tuning the workloads instead.
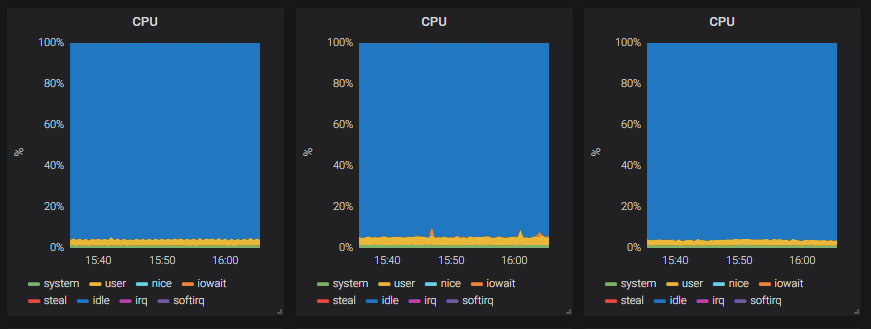
Screenshot from Grafana of the nodes’ CPU usage.
I started “describing” the nodes, to see which requests the pods made on their CPU and memory and I came across the KubeDNS deployment. In its default deployment spec it’s specified with requests for a combined total of CPU 260m and memory: 110m. CPUs are allocated in “millis”, so that’s just over 1/4th of a CPU.
At one point I had a three-node cluster and a KubeDNS deployment, scaled to three pods. Thus KubeDNS still reserved a good 1/4th of my cluster, comparable to 3/4ths of one node.
I took a look at the actual resource consumption, and as you’ll see in the picture below, it’s pretty far off from “1/4th of a cpu”. Your mileage may vary, but it made me want to make some changes to the deployment of KubeDNS in my cluster.
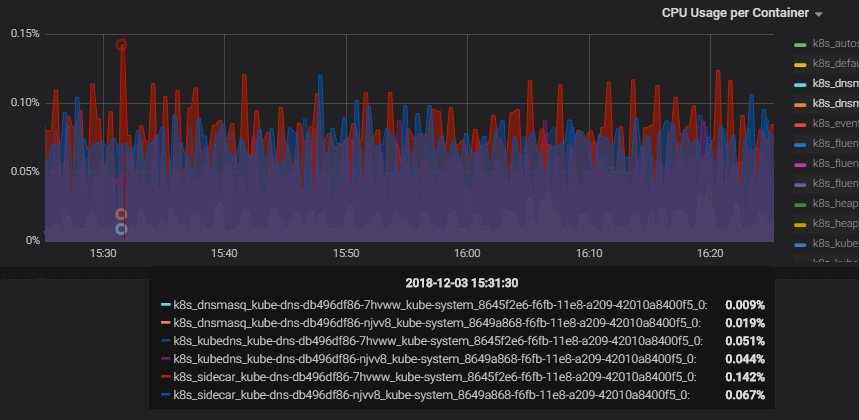
Example screenshot from Grafana of the CPU usage per container over an hour. The container that used the most at a single point, is the sidecar shown with the red line, at 0.142% of the cpu, it requests “10m” or “1% cpu”. The dnsmasq uses 0.02% or the cpu while requesting “150m” or “15%”. The kubedns uses 0.05%, while requesting “100m” or “10%”.
First off to Google and into a GitHub issue, where it seems there’s still no good out of the box solution. Back in the kube-dns.yaml.base, there’s even a suggestion on gathering more data about usage, around the requests and limits.
I understand the choices made. We want KubeDNS running at all costs, and thus don’t want it to be lacking resources. It's a managed cluster on the Google Kubernetes Engine (GKE) and how would they know about the needs of my cluster? The defaults are “helpful” albeit extreme in a small cluster.
NB: if you intend to follow along in your own cluster and your goal is to redeploy KubeDNS or CoreDNS, just read on. If you want to reconfigure the requests and limits of KubeDNS, you should benchmark these now. It'll be difficult after we've removed it in a little bit.
I failed with kubectl edit
An imperative way of manipulating resources albeit not best-practice is kubectl edit. It’s fast, but as your changes are only stored in current configurations; you can easily lose track. I fiddled with the requests and limits and "Kubernetes" redeployed the kube-dns pods! It looked like a job done, alas, my changes kept getting reverted. My "improved" pods were thus available only for a brief moment, before "original ones" took their place. This led me to learn about an interesting feature of Kubernetes called..
The Addon Manager
A fantastic utility that can help tamper-proof resources in a cluster is the Addon Manager. In one of its "modes" it reverts all changes made to “enabled addons”. An "enabled addon" is a resource template, like a deployment or service, placed in "the addon folder" on a kubernetes master. More on the Addon Manager.
The Addon Manager can also just make sure that the resources are always available in the cluster. By using the label mode=EnsureExists it will just (re-)create missing resources. Using mode=Reconcile it keeps them aligned with the provided templates.
It’s not hard to imagine that "tamper-proof" can be highly practical. When your cluster also runs system components, their configuration should be stable. You don't want them to change by a quick kubectl edit ...
But stable doesn't mean someone shouldn't (re-)configure the system components ever. The way you make this change is by updating the applied template file. This means updating the yaml-files in "the addon folder" on a kubernetes master.
I don’t have access to the master, because it’s a managed Kubernetes cluster on GKE, and the KubeDNS deployment did run with the label mode=Reconcile. It looked a bit dark.
I Succeeded with kubectl scale
Revisiting the default requests and limits of KubeDNS being a bit extreme, the people at Google has made a nice guide about Reducing Add-on Resource Usage in Smaller Clusters. More specifically, by setting the number of replicas of the KubeDNS autoscaler to 0, I’m able to choose the number of deployed KubeDNS pods myself.
But what about the Addon Manager? The number of replicas are part of a deployment, so why don’t the Addon Manager enforce a specific number of pods? Looking back at the kube-dns.yaml.base, there’s an explicit comment about not including the replicas. Kubernetes defaults to one replica, and the Addon Manager doesn't enforce a number. The autoscaler (or we) can now freely scale the KubeDNS deployment.
I don’t like manual work if I can avoid it, but that’s not even the biggest issue here; how does this help with reconfiguring the KubeDNS deployment? It’ll still reserve a lot more resources than it actually uses, and I’ll just end up with less pods for handling the actual traffic?
The way it helps is by letting me explicitly scale the KubeDNS deployment to 0! And now there’s no default KubeDNS pods taking up resources in our cluster!
Awesome! Wait, so what happened now to resolving DNS in our cluster?
Let’s try it again by using the snippet from before:
$ kubectl exec -ti busybox -- nslookup kubernetes.default
Server:    10.23.240.10
Address 1: 10.23.240.10
nslookup: can't resolve 'kubernetes.default'
command terminated with exit code 1
No dice; with no DNS solution deployed, there’s no DNS resolution inside our cluster. This wasn’t the goal, the goal was just to limit its resources! Moving on to..
Redeploying KubeDNS with Custom Requests and Limits
(In case you want to deploy CoreDNS instead, you can jump ahead.)
First, get a deployment-spec for KubeDNS. You can export the currently deployed KubeDNS by using the command below:
(This will be the base for our custom KubeDNS deployment)
kubectl get deployment kube-dns -n kube-system -o yaml --export >> kube-dns.yaml
You can also clean up the KubeDNS template from the official github-repo. The export from above though, will almost be configured for you.
Next, make the following changes:
- Your cluster has a deployment called
kube-dnsso change the name e.g. tocustom-kube-dns - Remove the following two lines/labels:
(The deployment we’ll be making isn’t applied as an addon. As the Addon Manager can’t find it, it’ll be “reconciled”, i.e., deleted immediately.) addonmanager.kubernetes.io/mode: Reconcile, andkubernetes.io/cluster-service: "true"- Update the requests and limits considering the values you’ve recorded earlier. (There’s no silver bullet for this, you just need to monitor and adjust accordingly.)
- Make sure the
kube-dnspod in the deployment has the labelk8s-app=kube-dns. The kube-dns service (still managed by the addon-manager) has apodSelectorwith this label. By reusing the label, the service will route traffic to our custom-kube-dns deployment. - Set replicas to 1, if it’s not already set.
Deploy the updated kube-dns.yaml in the kube-system namespace of your cluster like so:
$ kubectl apply -f kube-dns.yaml -n kube-system
deployment.extensions/custom-kube-dns created
You can test that it works with the busybox like before:
$ kubectl exec -ti busybox -- nslookup kubernetes.default
Server:    10.23.240.10
Address 1: 10.23.240.10 kube-dns.kube-system.svc.cluster.local
Name:      kubernetes.default
Address 1: 10.23.240.1 kubernetes.default.svc.cluster.local
Redeploying the kube-dns-autoscaler
I wasn’t unhappy with the way that the kube-dns-autoscaler scaled the kube-dns deployment. But, it’s scaling the default deployment. We need it to scale our custom-kube-dns-deployment.
NB: if you use RBAC and want a new service account for the kube-dns-autoscaler you'll need an authorized account. For instructions about authorizing your account as a cluster-admin see: Troubleshooting RBAC on Google Container Engine. Below I'll be reusing the kube-dns-autoscaler service account already present.
Copy out the deployment part of the official documentation from GitHub. This will be the base for our custom kube-dns-autoscaler:
- Update the name of the deployment like above. The present autoscaler is already called
kube-dns-autoscaler. - In the
commandyou need to update the--targetflag. It should point to thecustom-kube-dnsdeployment you deployed before. So if you named itcustom-kube-dns, set the target like below:--target=Deployment/custom-kube-dns - Delete the two lines that make the addon manager reconcile the object, like above, i.e., the two labels:
kubernetes.io/cluster-service: "true"addonmanager.kubernetes.io/mode: Reconcile
Deploy it in your cluster and notice how it almost immediately scales your custom KubeDNS deployment.
In my three node cluster, it scaled my custom-kube-dns deployment to two replicas.
The autoscaler won't change the number of KubeDNS replicas if it's optimal. In that case, you can try scaling it differently. The autoscaler should scale it back, also almost immediately.
Deploying CoreDNS
NB: for the following step you need to authorize your current user as a cluster-admin, see: Troubleshooting RBAC on Google Container Engine.
- Run the
deploy.shfrom the documentation. - Do not delete the KubeDNS deployment; the KubeDNS deployment is still managed by the Addon Manager. If you delete it, it’ll be recreated, instead
- Scale the KubeDNS-autoscaler deployment to 0
- Scale the KubeDNS deployment to 0.
Finally, verify that DNS works again:
$ kubectl exec -ti busybox -- nslookup kubernetes.default
Server:    10.23.240.10
Address 1: 10.23.240.10 kube-dns.kube-system.svc.cluster.local
Name:      kubernetes.default
Address 1: 10.23.240.1 kubernetes.default.svc.cluster.local
Conclusion
Customizing the DNS solution on a GKE cluster isn’t hard, but a tiny bit tricky. When it’s originally deployed like an addon, the Addon Manager will keep reverting your changes. When we can't access the master, we almost can't make changes to the applied addons. That GKE “abstracts away the master” is completely fine, it’s a managed kubernetes solution. We don’t want to have to do a lot of configuration, we just want to get rolling with nice defaults. However, allowing us to tune it ends up proving incredibly useful. With the Addon Manager only reconciling a part of KubeDNS. We get to use the other nice defaults, but still tailor it to our specific needs. Especially in this case, where there aren’t any nice defaults yet. The proper configuration is highly situational, i.e., how many resources KubeDNS is going to use depends on what's running in your cluster.
Published:
Updated: