Building a cancer treatment training system: Getting started

Read the second part of Building a cancer treatment training system blog series.
If you read the last post about the problem of liver cancer ablation training system , this is a continuation post where I describe how we actually set out to solve the problem. If you didn’t I suggest reading that post first, because otherwise the following can be a tad confusing.
Building a system like this, one which has not been built before, is an R&D project with a heavy slant to the R. We decided to play it safe, and built several prototypes, starting from the trivially simple, to quite complicated.
We started out with some material tests, to figure out how we could build a low cost, durable mannequin which can be repeatedly stuck with needles and not disintegrate. So we bought a bunch of different materials and found a few suitable ones:
- Silicone with Shore Hardness level 10 is similar to human tissue, but is expensive because it has platinum in it
- Ballistics gel also works well, but has a tendency to start growing bacteria or mold, and is prone to drying on the surface. It is also slightly soft in usual configurations for a large needle. Adding glycerol or other preservative helps with the molding, and a coat of soft silicone on top helps with the drying.
- Soft foam pad, medium or low density, like the ones found in yoga mats also works reasonably well
- EPDM rubber a’la bike inner tube tire is a decent skin analogue at about 1mm thickness, it also retains its consistency over about 120 small needle insertions
We also figured a good way to build a prototype training system would be to use an existing human shape, like a mannequin from a shop. But before we go around hunting for one, we should maybe try something smaller. Enter Ken. Yes, Barbie’s boyfriend.
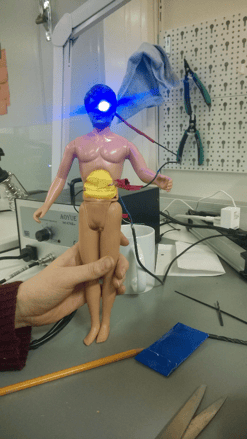
We gutted Ken, and filled his stomach with soft material, and closed the cavity with EPDM rubber. We also soldered a tumor simulation based on steel wool, electrical tape, injection needle, an LED and a USB power source to build a simple training simulation system. Basically, pushing the needle into the correct position will light the led mounted into Ken’s eye socket (because we could). Cyborg-ken worked well, and we were happy enough to proceed to a larger version, but first we would need to solve how to actually track the needle. A conduction based solution has the limitation, that inserting the needle too deep, will also indicate correct needle placement (because the entire needle is conductive). Also we could not show guidance images based on conductivity alone.
We set out to find an electromagnetic tracking system, and after some negotiation ended up purchasing a system named Patriot from US based company Patriot. The system essentially has a big magnet and a magnetometer which estimates the sensor position based on magnetic field measurements. The system has some limitations.There is what we call a weirdness plane on the direction which the magnet’s poles are at. The system can only detect the sensor’s distance and orientation in regards to the weirdness plane, but not on which side it is on. This causes some issues with placement of the magnet. The system is also very sensitive to electromagnetic interference from electrical devices or ferromagnetic items.
Another problem was creating the guidance images themselves. Fortunately we found a project called Visible Human Project, where some friendly folks had published very high fidelity CT-images taken from cadavers. Now it was time to start looking at the software. Third blog post of this series is coming soon. See you then!
Published:
Updated: