How to streamline your ITSM implementation with Jira Service Management

Information technology service management (ITSM) is a strategic way of delivering IT services that shifts focus away from IT systems and targets the processes an IT department uses to design, create, deliver, support, and manage IT services.
ITSM is an end-to-end tooling and management process that covers end-users, infrastructure, and services. ITSM uses the Information Technology Infrastructure Library’s (ITIL) best practices framework to manage and optimize IT services throughout the IT lifecycle. ITIL’s latest edition contains 34 practices, which you can adapt to your organization’s needs.
ITSM improves services and helps achieve your overall business objectives by ensuring that service support and delivery are afforded the most appropriate technology and processes, and that the right people are in place to use them.
As your organization deploys more of these interconnected technologies, you’ll need to make informed decisions about increasingly complex software licensing, maintenance, and integrations.
Jira Service Management (JSM) is one of the most popular and reliable ITSM tools today. It’s built on the Jira platform and designed to centralize real-time service concerns. It organizes requests into service projects and gives customers access to appropriately scoped help through a help center, chat, by email, or via an embeddable widget.
In this article, we’ll examine the benefits of ITSM and how JSM implements it, and then walk through streamlining your request service management process with JSM.
The benefits of ITSM
Information technologies can now viably improve efficiency and productivity across your entire organization, but managing a large set of disparate tools and services can be challenging. ITSM offers a well-thought-out approach to choosing tools and processes, and provides several benefits for your business.
- It improves employee efficiency by letting them know what services are available and how to use them.
- It allows your business to quickly adopt new technologies and methodologies.
- It enables you to respond to incidents promptly.
ITSM also directly benefits your IT teams in the following ways:
- It provides guidelines for how your IT team can automate their workflow to be more productive.
- It shortens the time between incident detection and resolution.
- It increases accountability by enabling you to assign roles and responsibilities within your IT team.
- It enables you to generate more actionable insights from analytics to improve IT performance and provide better services.
Streamlining your current ITSM approach with JSM
Your IT team frequently needs to address service requests from your customers. Let’s use JSM to solve a fairly common service request issue: reopening a closed account.
Let’s go through a step-by-step process describing how to tailor your ITSM process to use JSM so your customer can submit a request via a service portal or email.
#1 Understand what you need to achieve
The first step in processing a service request is understanding what you need to achieve optimal IT service and support.
The service project shown in this walkthrough involves members from the help desk, the security team, and the IT support team, so it should be created as a company-managed project. These projects require a Jira admin to configure them. You can also create team-managed projects for autonomous teams in your organization who don’t need to work with other teams, need more flexibility, and require control over their processes.
It’s good practice for your organization to have a detailed breakdown of how to process requests. A well-defined procedure lets your team process service requests more efficiently and promptly address customer needs. You should try to standardize your process as much as possible, even if there are some variations between specific service cases.
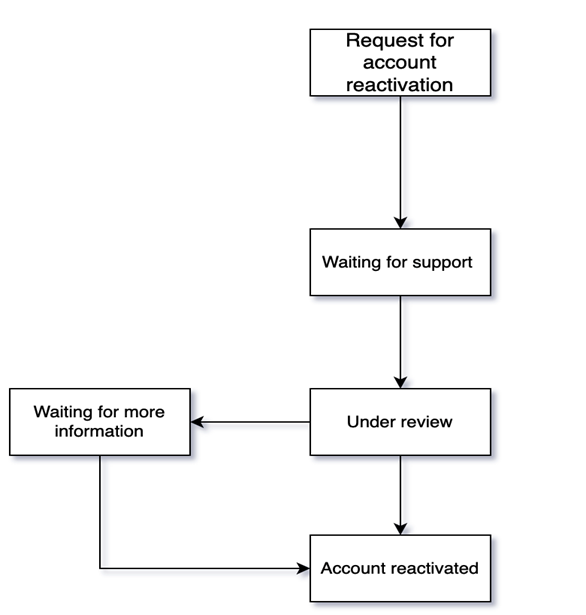
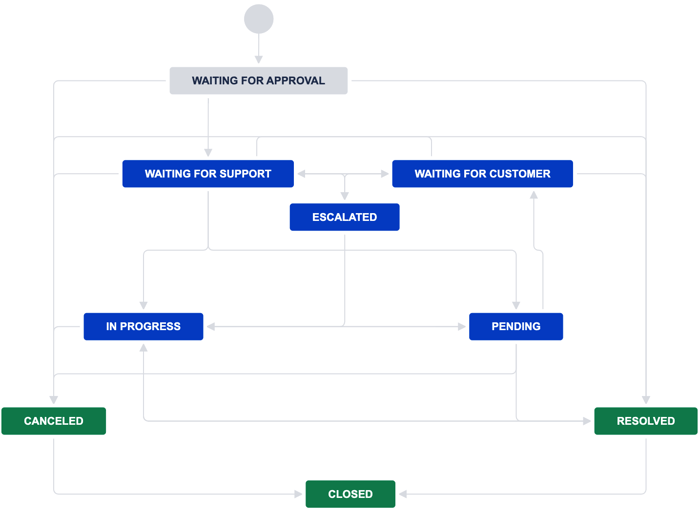
A simple workflow is appropriate to reactivate the account of your hypothetical customer. Something like the following flowchart sufficiently documents the process:
-
The service team receives a customer’s request to reactivate an account. Part of this step is making sure the request meets pre-defined requirements in an automated verification process.
-
Because of the sensitive nature of this request, it’s forwarded to the IT security team to verify its reporter’s identity.
-
An agent is assigned to work on the customer's request. If they need more information from the customer, the workflow moves to a “waiting” step.
-
The agent resolves the issue and reactivates the account.
- After resolving the issue, the agent closes the request and gets feedback from the customer to improve service delivery.
Jira offers a default workflow that matches these needs. You’ll see this in step #3.
#2 Create a Service Request Project on JSM
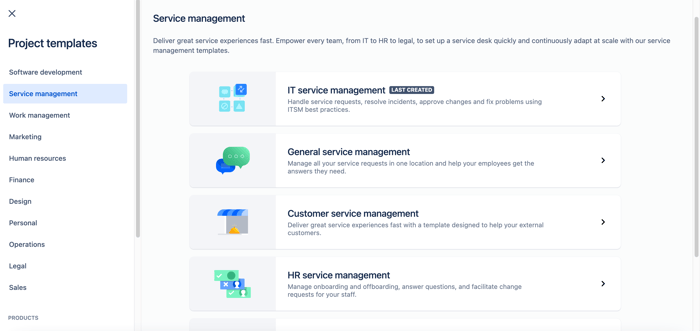
Next, you need to create a new service request project on JSM. You can use one of the many provided project templates to get started quickly. Each template is pre-configured with features specific to the template type, including workflows and request types.
To create a new project, select Projects > Create project in the menu at the top of your dashboard.
Select IT service management from the provided templates, then select Use template.
Next, provide a project name like “Customer support” and either assign a key to your project. or use the default key Jira generates from your project name.
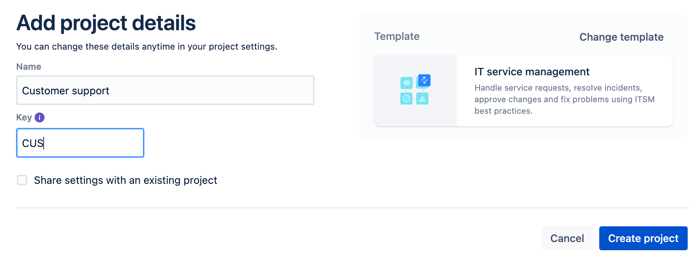
The project key is combined with each issue’s number to form issue keys, which are unique identifiers used to track and reference work in Jira.
You can adjust these project details later if you need to. For now, select Create project to finish.
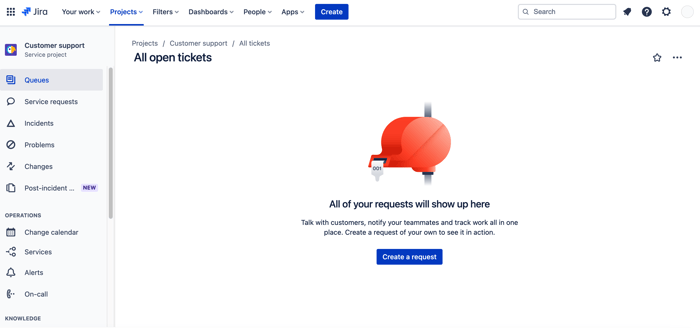
The newly created project appears on your dashboard where you can manage settings and view its open tickets.
#3 Set up request types, workflows, and queues
As an administrator, you can configure the request types available in each portal in your help center. Any request submitted by a customer, or task generated by an agent, automatically becomes an issue on the admin or agent dashboard.
During its lifespan in Jira, each issue follows a defined, automatable workflow. Jira provides some default workflow options, but a company-managed project lets you configure your workflows to better represent your organization’s specific needs. Conversely, team-managed projects apply the same workflow to all issue types.
You can group requests in the Service Portal and then have queues to assign them to the appropriate agent or team automatically. Queues are configurable with pre-defined criteria to determine how issues are grouped and prioritized in the agent view. This gives your teams real-time visibility into the current status of your service project and ensures they’re always working on the highest priority requests.
Set up request types
To configure request types for your Customer support service project, select Project settings > Request types on the left menu.
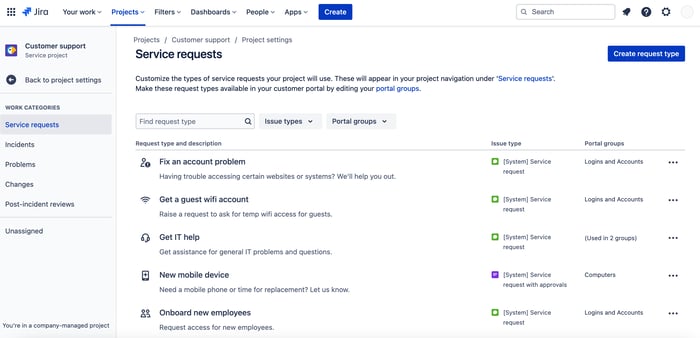
Because your service project is based on a template, it contains several pre-configured request types you can use, including the Fix an account problem type that meets the needs of this specific use case — customers trying to reactivate their accounts.
However, creating a type from scratch gives you a better understanding of what goes into a request type, so select Create request type.
Next, give your request type a name like “Account issues” and add a brief description to tell your customers what to use this request for.
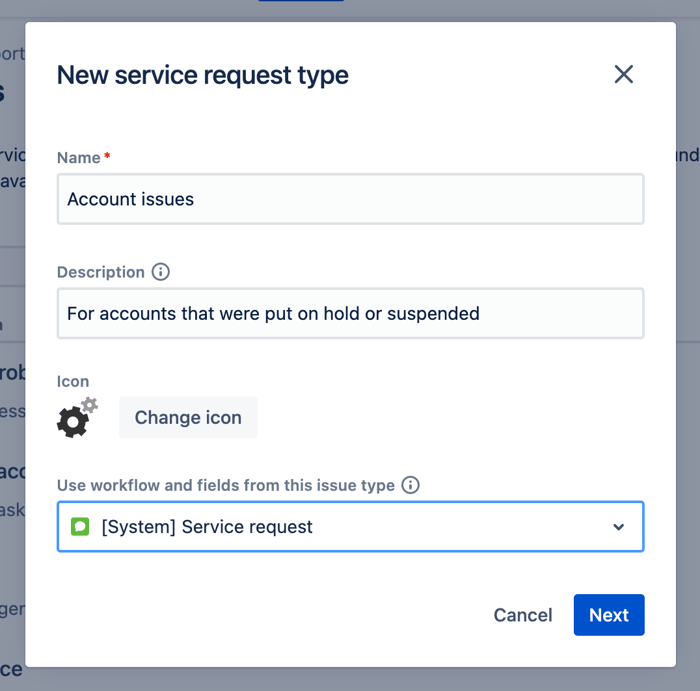
The default Service request workflow option lines up well with the workflow described in step #1 — providing service to a customer trying to reactivate their account.
Select [System] Service request from the dropdown menu, then select Next to select a portal group for your request type.
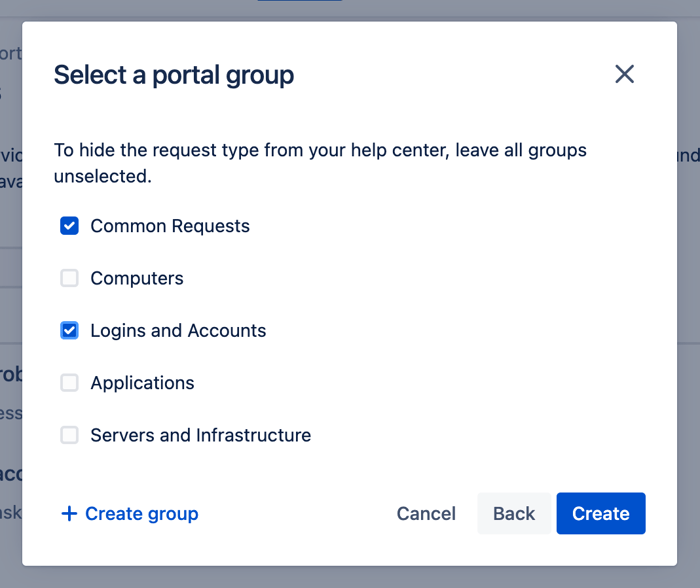
Portal groups are used to help customers locate the right form to use when submitting their requests. For example, all forms for your Account issues request type are categorized under Logins and Accounts. Request types with no portal groups assigned are hidden from help center users.
Select Create to finish your request type. The newly created request appears in the Request types under Project settings in your service project, on the left menu in your dashboard.
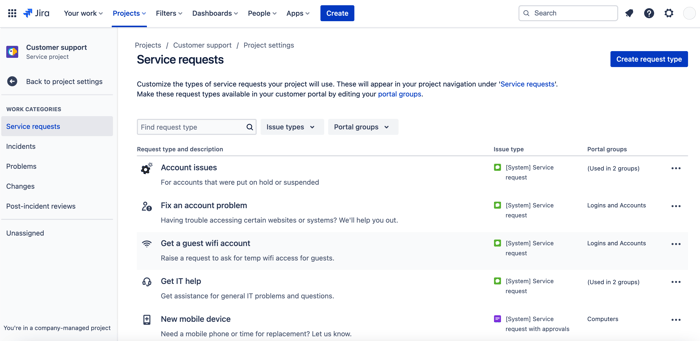
Here, you can also view the status of the service requests in your project to monitor their workflow progress.

Set up queues
To set up a queue, select Project settings > Queues on the left menu.
Then, select Manage queues.
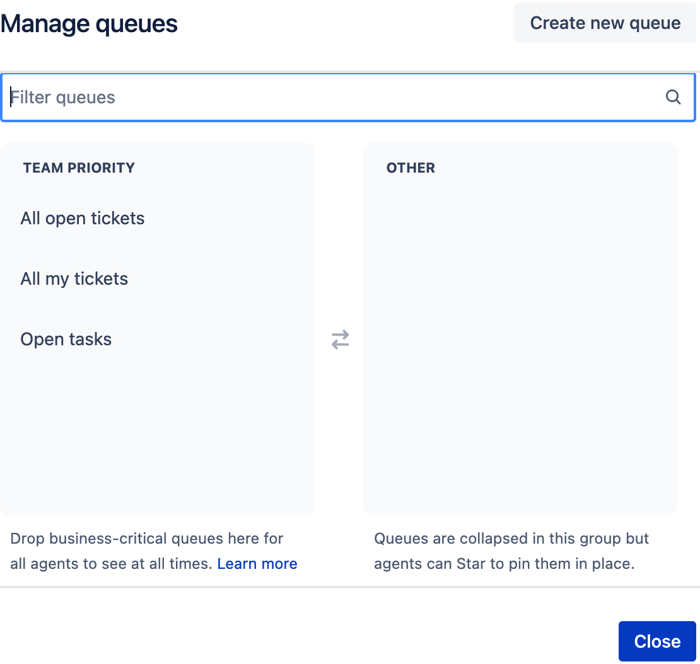
JSM lets administrators assign queues into two groups:
- Queues in the TEAM PRIORITY group address business-critical issues and are always displayed to all agents.
- Queues placed in the OTHER group do not require immediate attention by default, but you can assign them to specific agents or teams by starring them to place them at the top of an agent’s list.
Customers locked out of their accounts are a fairly high-priority category of issue with a simple resolution workflow, so their requests merit a separate queue to “jump the line.” So, instead of using one of the pre-configured default options, select Create new queue.
Provide a name like “Account reactivation” for your queue.
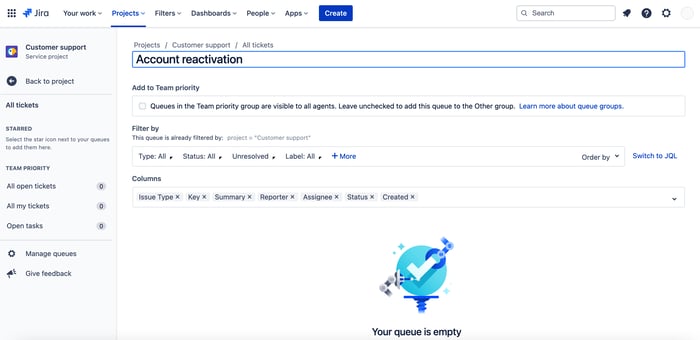
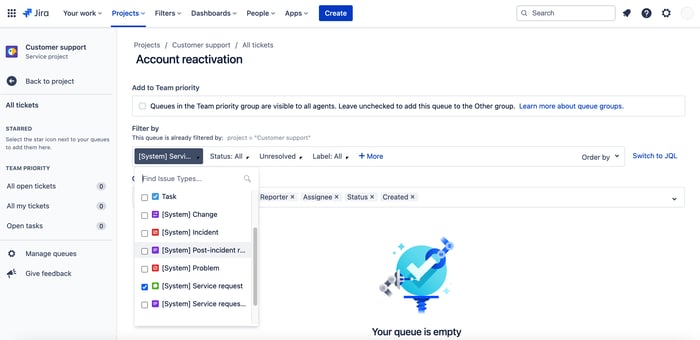
Queues are configured to contain specific issue types. As agent-facing labels for pieces of work, issue types correspond to the workflows you have set up.
To use the default workflow you examined earlier, select [System] Service request from the Type: dropdown.
Select Create to finish. The newly created queue appears above the Manage queues option in Project settings.
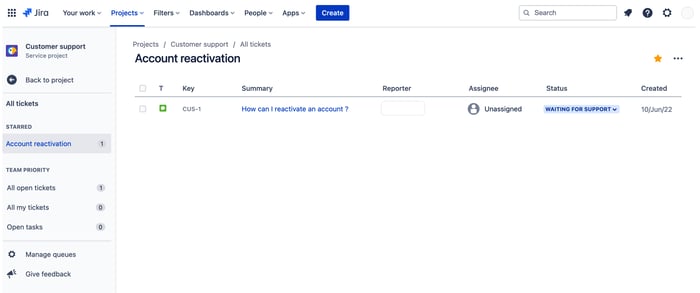
The best way to get an idea of how queues work is by populating a queue with some placeholder issues.
To create a service request ticket, navigate to your project and select Service requests, then select Create a service request ticket and fill the form. The newly-created issue appears in the Account reactivation queue.
Users can control what issue information is displayed in the queue, including creation date, key, summary, status, or reporter.
Tip: Don’t set up too many queues since they’ll clutter your left frame and it will be hard to find the proper queue to work in.
#4 Set up a service portal and a channel for incoming emails
Your customers can submit requests in JSM through the help center or by email. Configuring an email automatically adds the requests to your queues and lets your team members open issues through a centralized JSM page.
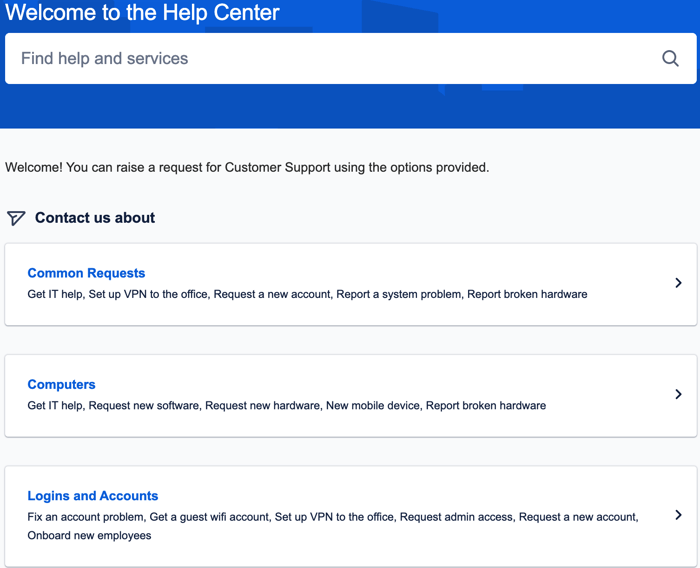
When you sign up for JSM, your site automatically has a help center created. For each service project in your site’s help center, JSM also automatically creates a portal your customers can use to submit requests or search for information. As an admin, you can customize how each portal appears to visitors.
Set up a service portal and help center
To customize your service portal, select Project settings > Portal settings on the left menu.
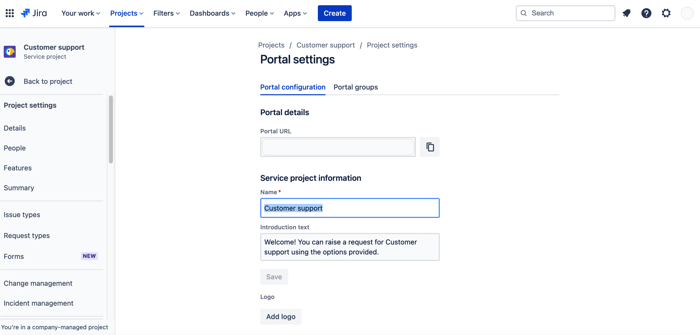
You can customize your portal’s welcome message to provide a brief description for your customers. For this project, the default text is appropriate.
You can also upload an image to customize the logo that appears in notifications sent by your service portal by selecting Add logo.
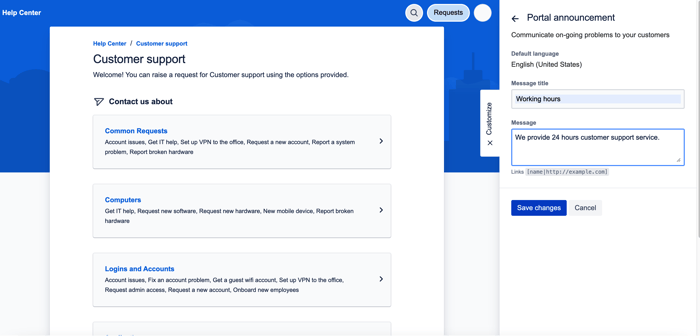
Announcements let you convey important information like a major service upgrade or your organization’s working hours to your customers.
You can set whether agents or only admins can add announcements by selecting the Manage portal announcements link in the Announcements section, which opens the Help Center customization view.
Add an email address
To add an option for email requests to your project, select Project Settings > Email requests on the left menu.
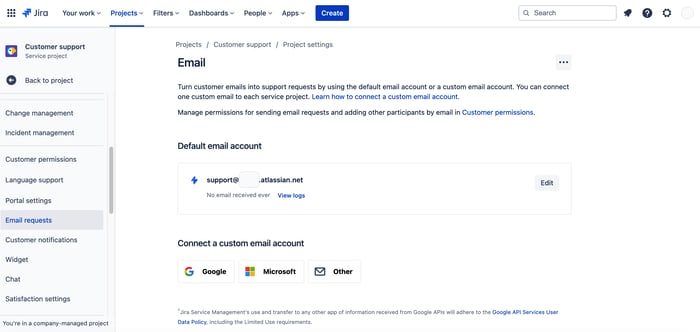
You can use the default email account JSM generates for you or add a custom email account by selecting Other.
#5 Add team members and customers
Now that your service management project is set up, the next step is to add the agents or teams that process requests and the accounts of individuals or organizations who can submit requests. Any member of an organization with an account can submit a request through the portal or by email. Admins can also raise requests for customers even if they haven’t finished signing up for an account (for example, when they request help over the phone).
Add agents
To add an agent, select Project settings > People and then select Add people.
Enter the email of a team member in the search box, then select Service Desk Team in the Role dropdown list.
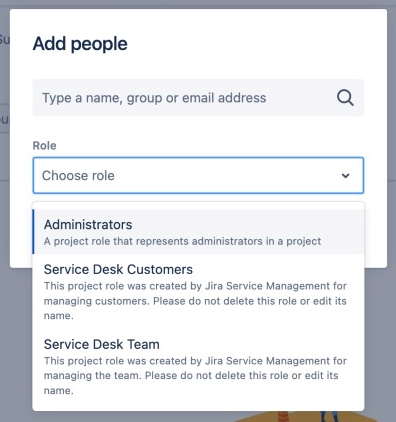
Click Add to send the agent an email invitation and add them to your service project.
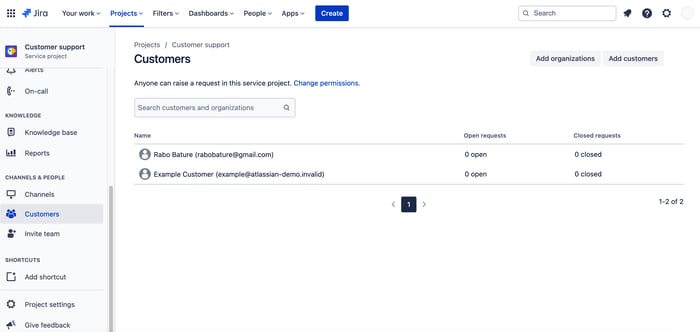
Add customers
To add a customer, navigate to your project, then select Customers on the left menu, then select either Add organizations or Add customers.
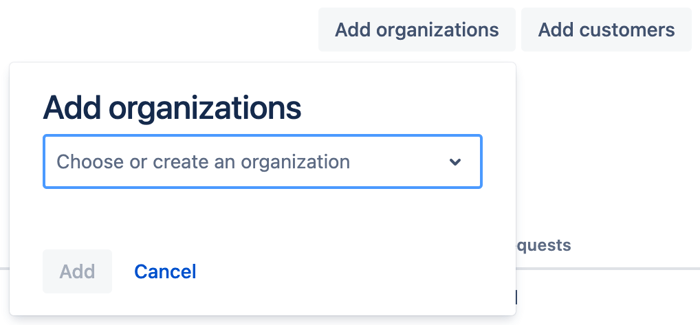
Provide the customer’s email address or the organization’s name, then click Add to finish. The newly created customer appears on the Customers page in your service project.
Conclusion
ITSM provides a systematic approach to delivering IT services. Jira Service Management (JSM) is a popular ITSM tool that lets you efficiently manage your organization’s service desk operations through a centralized portal. Your team members can collaborate in real-time on a single platform and keep service requests organized and prioritized.
However, it can be daunting to try to maximize your returns on the complex Atlassian ecosystem. To help you get the most our of JSM, Eficode offers business and technical consulting, training, license management, and managed services. Together we can create the best path forward to ensure you deliver the most streamlined IT services.
Published:
Updated: