Deploying Jenkins on Kubernetes

A setup for working with Windows build slaves
Installation and management of CI servers is a critical task for any IT team. Kubernetes and its package manager (Helm) provide
an easy way to customize Jenkins installations. Let’s see how to do this and add Windows build slaves.
Container solutions (e.g. Docker) enable your developers to develop applications and ship them for testing or deployment without having to worry about environment setup or facing the “works-on-my-machine” phenomenon.
Kubernetes (aka k8s) provides an orchestration framework for containerized applications. This framework ensures the availability of the containerized application through health monitoring and the recovery of failed containers.
Containers and k8s speed up your dev-build-test-deploy cycle by abstracting most of the infrastructure management overhead. New tools build on top of k8s and containers to enable infrastructure, configurations, and even application deployment to be created and managed from code. Such tools include: Kops -a k8s cluster management tool- and Helm (a k8s package management tool). These tools allow you to automate your k8s cluster creation and management. Further, they allow you to easily deploy and manage your applications on the k8s cluster.
Kops allows you to define your k8s clusters using manifest files expressed in Yaml format. Once you have a cluster created, Kops will maintain the state of your cluster in an S3 bucket.
Helm enables you to manage applications deployment on your k8s cluster. It provides a bunch of stable packages -called charts- which you can deploy to your k8s cluster out of the box. Alternatively, Helm allows you to create your own chart and reuse it.
How to deploy Jenkins CI server on k8s cluster - on AWS ?
In this post, we will deploy Jenkins CI server on k8s cluster -on AWS- using Helm, and then connect Windows slaves to it. The following steps are needed to deploy Jenkins on k8s:
Note: While this post uses AWS as a cloud provider. The concepts and steps discussed here can be mapped to other cloud providers offering similar services.
-
Create a k8s cluster on AWS using Kops by following this guide.
-
Once you have the cluster created you need to install Kubectl and then install helm on the machine which you use to manage your cluster. Once installed, Helm needs to be initialized so it automatically installs its server. This is called Tiller on the k8s cluster you are using.
-
Now that you have a cluster, and Helm is installed and initialized, you can install the stable Jenkins chart on the k8s cluster using the following command:
helm install --name <<your-release-name>> stable/jenkins
That’s it! You now have a Jenkins master deployed on your cluster and exposed to the rest of the world using a load balancer (AWS ELB in that case). Helm output will tell you how to extract the URL of your Jenkins master and the admin password.

What happened behind the scenes with that one line Helm command?
The figure below shows what has happened. Helm has created a deployment and a couple of services on your k8s cluster. The deployment defines a desired state for the pod containing the Jenkins master. This allows k8s to bring up a new pod running a Jenkins master inside a docker container if the current pod dies. Since pods are mortal, the services created by this step allow other pods / applications to reach the Jenkins master using a DNS (service) name, instead of the IP of the underlying pod. The Jenkins master port is exposed externally (to be accessed from anywhere on the internet) using the cloud provider’s load balancer (in this case, AWS ELB). So, no matter what happens to the pods inside the cluster, you will always be able to access your Jenkins master through the load balancer IP. The Jenkins agent service is, however, exposed with Cluster IP meaning it is only accessible from within the cluster.

But wait! How can I customize my Jenkins configurations?
You need not worry as the Jenkins Helm chart has a configurable parameters file which you can customize. For example, you can specify which plugins should be installed with your Jenkins and which docker images to use for both master and slaves.
You might be wondering - where are the slaves?
We used the default configuration provided with the Jenkins Helm chart. In that configuration Jenkins comes with the Jenkins Kubernetes plugin installed. This plugin allows the master to create (on demand) slaves as docker containers in pods. This means that whenever there is a job the master will create a slave, on the fly, inside your k8s cluster. The slave will perform the job and then will be discarded.
Now, you might be wondering if you can have Windows slaves, right?
In a previous post, we discussed the current state of the Windows support in k8s and concluded that at this point of time it is not mature enough for production-like environments when you use Kops to manage your k8s cluster. As a result, we recommended that Windows hosts are created outside of the cluster and are allowed to communicate with applications deployed on your k8s cluster. The following diagram illustrates the architecture we use:
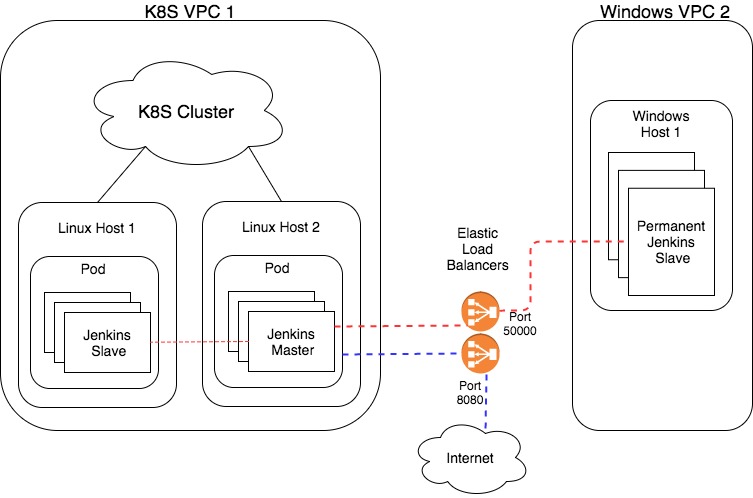
We created a separate AWS VPC to host Windows VMs hosting permanent Jenkins slaves.
Connecting the Windows slaves with the Jenkins master
Helm has exposed the Jenkins agent service (responsible for connecting slaves) to the cluster only (using the Cluster IP service type ). Helm assumes that all slaves will be connecting from within the k8s cluster. However, the Windows slaves will be connecting from outside the cluster as we described above.
To make the Jenkins agent service accessible by Windows slaves connecting from the Windows VPC, there are two options:
-
Exposing the slaves agent using NodePort service type
Node port exposes the service on a specific port across all cluster nodes. This makes the service accessible from within the cluster using Cluster IPs, from within the k8s VPC using AWS private IPs, and externally (from outside the k8s VPC) using any public IP of any of the k8s nodes. The problem with that approach is that k8s nodes are mortal and when they die they are replaced with new nodes (and consequently, with new external IPs). -
Or, exposing the slaves agent using LoadBalancer service type
A load balancer will always connect to the Jenkins agent service from the Windows VPC regardless of the internal IP of the service. Again, you will need to allow traffic from the Windows VPC only for security reasons.
Note: for the first option you need to allow traffic on the Jenkins Slavelistener port (default 50000) from your Windows VPC in your k8s nodes’ security group. By default this security group blocks connections from outside the k8s cluster VPC.
Note: If you have multiple services that need to be accessible from outside your k8s cluster then you might consider using an HTTP reverse proxy (e.g. Træfik) to avoid receiving hefty bills for AWS ELB.
Now you can have a Jenkins master deployed on your k8s cluster that is able to create Linux slaves on demand inside the cluster. Further, it can connect to permanent Windows slaves hosted on VMs outside the k8s cluster. In an upcoming post we will talk about provisioning Jenkins Windows build slaves using Packer and Terraform. Stay tuned!
Published:
Updated: