Staci - Support Tracking And Continuous Integration
Let's automate Atlassian!
A complete Atlassian tool stack automatically deployed and configured with Docker. Try out STACI and get some hands-on experience, with the Atlassian tools stack in just 15 mins.
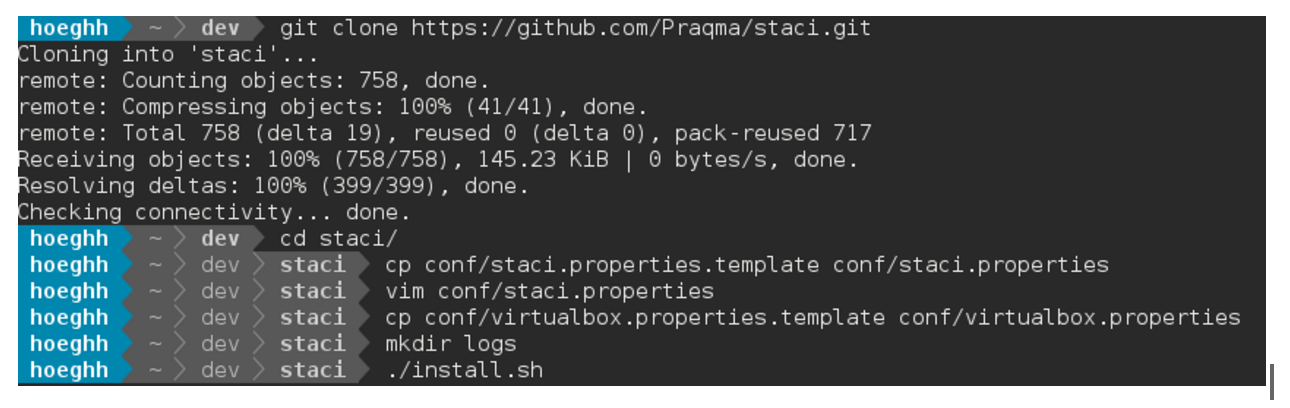
Clone our repository at github.com/Praqma/staci
Atlassian is well known for their efficient and scalable software. We use it. Our customers use it. But let’s face it, it takes a lot of effort to install, deploy and maintain the software. You would also like a test- or staging environment, so you need to duplicate the solution. So immediately we start thinking infrastructure as code. Imagine spinning up a complete Atlassian tool stack environment. Furthermore, what about having an easy way to test drive a selection of the products to see if they fit your needs?!
This is where Docker comes into the picture. Docker enables us to automate and deploy a given software stack with ease. It’s a great platform and has a huge community to back it up. Dockerizing Atlassian Jira is nothing new. Nor any of the other Atlassian products for that matter. But there is still some way to go from building one Docker image, to configuring and deploying multiple containers to a datacenter. We simply need a provisioning layer to control and configure our Docker containers. And this is what our STACI project does by creating a complete toolstack for you.
STACI is a proof of concept codebase It’s a bunch of shell scripts that you can play with, to grasp the idea of making containers configurable and deployable with ease.
Let’s start at the beginning
What we wanted as output from STACI, was a container for each Atlassian tool. And we wanted them to build on the same image, housing the standard tools you would expect to find when dealing with software installations. So, basically we wanted something like this:
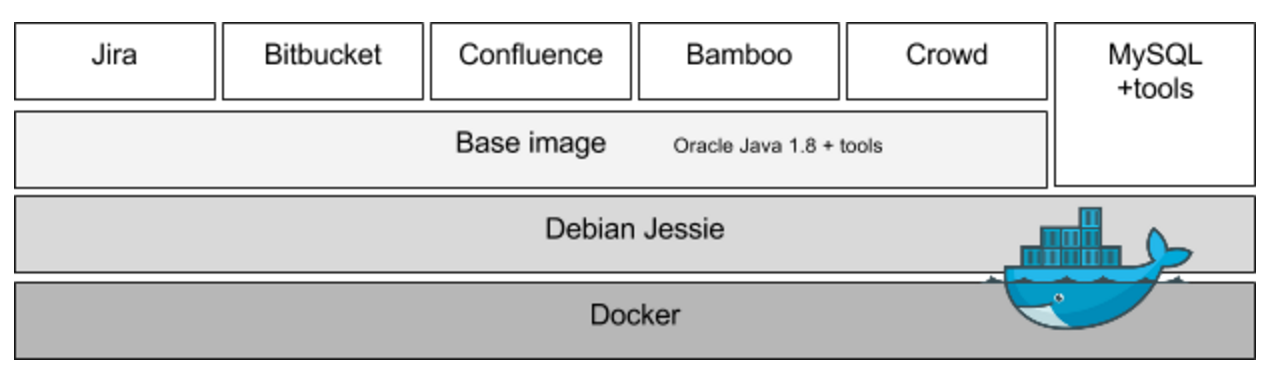
Since MySQL doesn’t need Oracle Java, we harness the power of the layered nature of Docker images by basing our MySQL image directly on top of our Debian Jessie image instead of our Base image. This limits the overhead in the image. Also, a MySQL installation normally needs different tools than our other containers. And with STACI it’s really easy to swap out MySQL with eg. PostgreSQL. We have already prepared STACI for that scenario.
Making container creation property dependent
Now, the problem is not to create Dockerfiles that give us these images. The problem is rather, that sometimes I would want only Jira and Confluence, while at other times maybe only Jira, Bitbucket and Bamboo. Maybe I want a context path to Jira and Confluence, maybe not. There are a lot of things that could vary between installs. E.g. Java memory, usernames, passwords or the bunch of information needed to deploy to OpenStack or another target. We centralized all the variable information into property files. One for STACI that houses all the specific parameters needed to build the Docker images, and one for each deploy mechanism like OpenStack, VirtualBox and VMware.
To fetch this information from our property files, we created the file tools.f in the folder $STACI_HOME/functions. All scripts that need to get information from our property files, need to source this file, and then use the given function. You would be given the value of the property “jira_contextpath” by calling :
$(getProperty "jira_contextpath")This way we only load the parameters we need, and they are a lot more visible in the code where they are being used. So when a script needs a specific property, it fetches it. In order to get OpenStack to work, we need to load a couple of properties. These are normally given by our OpenStack provider in the form of a Standard-openrc.sh file. Your provider can help you with a url. Both staci.properties and openstack.properties are stored in the repository as templates. So the first time you pull the repository, you should copy staci.properties.template to staci.properties in the same folder. And do the same for openstack.properties.template. The same applies for virtualbox.properties and vmwarevsphere.properties.
As of now, you can configure the following through staci.properties :
- Which Atlassian products to build/run
- Create a Docker Swarm Cluster on a cloud provider
- Set the timezone of the Java machine running Atlassian products
- Context path for all applications (www.url.com/jira)
- Database username, password and database name for each application
- Memory settings for Jira and Confluence (Xms and Xmx)
- Plugin wait for Jira
- Session cookie name for Jira and Confluence
We aim at expanding this feature list in the near future.
Getting things up and running
Ok, let’s dive in. Let’s say we want to start a MySQL, Jira and Bitbucket on a VirtualBox provider.
Now, there’s one vim command to edit staci.properties. The changes in conf/staci.properties are simple. We need to edit staci.properties to contain these lines:
createCluster:1start_confluence:0start_crucible:0provider_type:virtualbox
The above turns on clustering, creating a docker swarm. One node for each application.
It uses VirtualBox as a provider. Then, the template wants us to start Confluence and Crucible, but we turn this off. We turn on bitbucket instead.
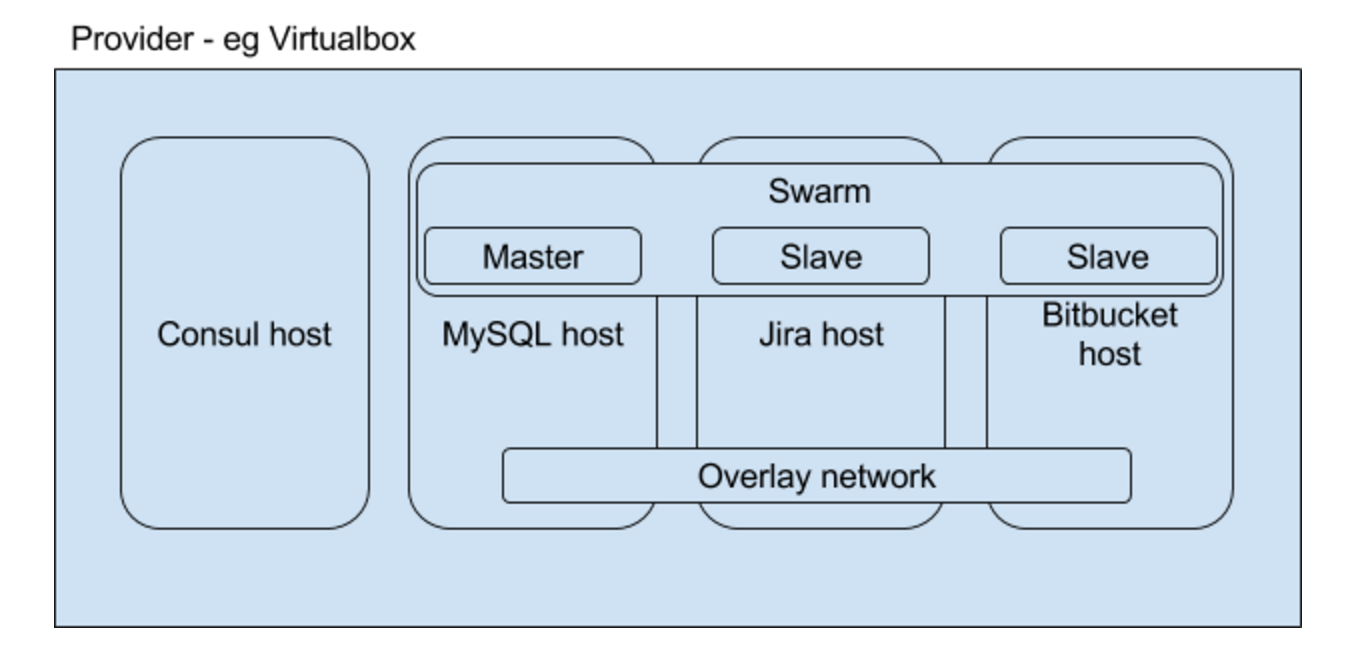
If you want to change the CPU count, memory or disk space of VirtualBox instances, edit the file conf/virtualbox.properties. If not, they will get 10GB disk space, 1 CPU and 1024MB ram. The last command, install.sh will start STACI, and do its work. It will create four instances in VirtualBox. One for Consul, a service discovery, a MySQL, a Jira and a Bitbucket instance. It will then build the base image on each node, and the respective application on its node. So Jira is built on the Jira node and so on. Then it will fire them up using the generated docker-compose.yml file in $STACI_HOME/compose. Before stopping, STACI will connect to the MySQL server and create the databases you need, and then configure them for use. Once done, it will print the information you need to set up each application. If a browser is specified in staci.properties, it will open the generated SystemInfo.html where the same information is generated, but in HTML. Since networking is possible between containers, you can use the container name for the MySQL database as reference from Jira. So the database hostname string for Jira should be atlassiandb.
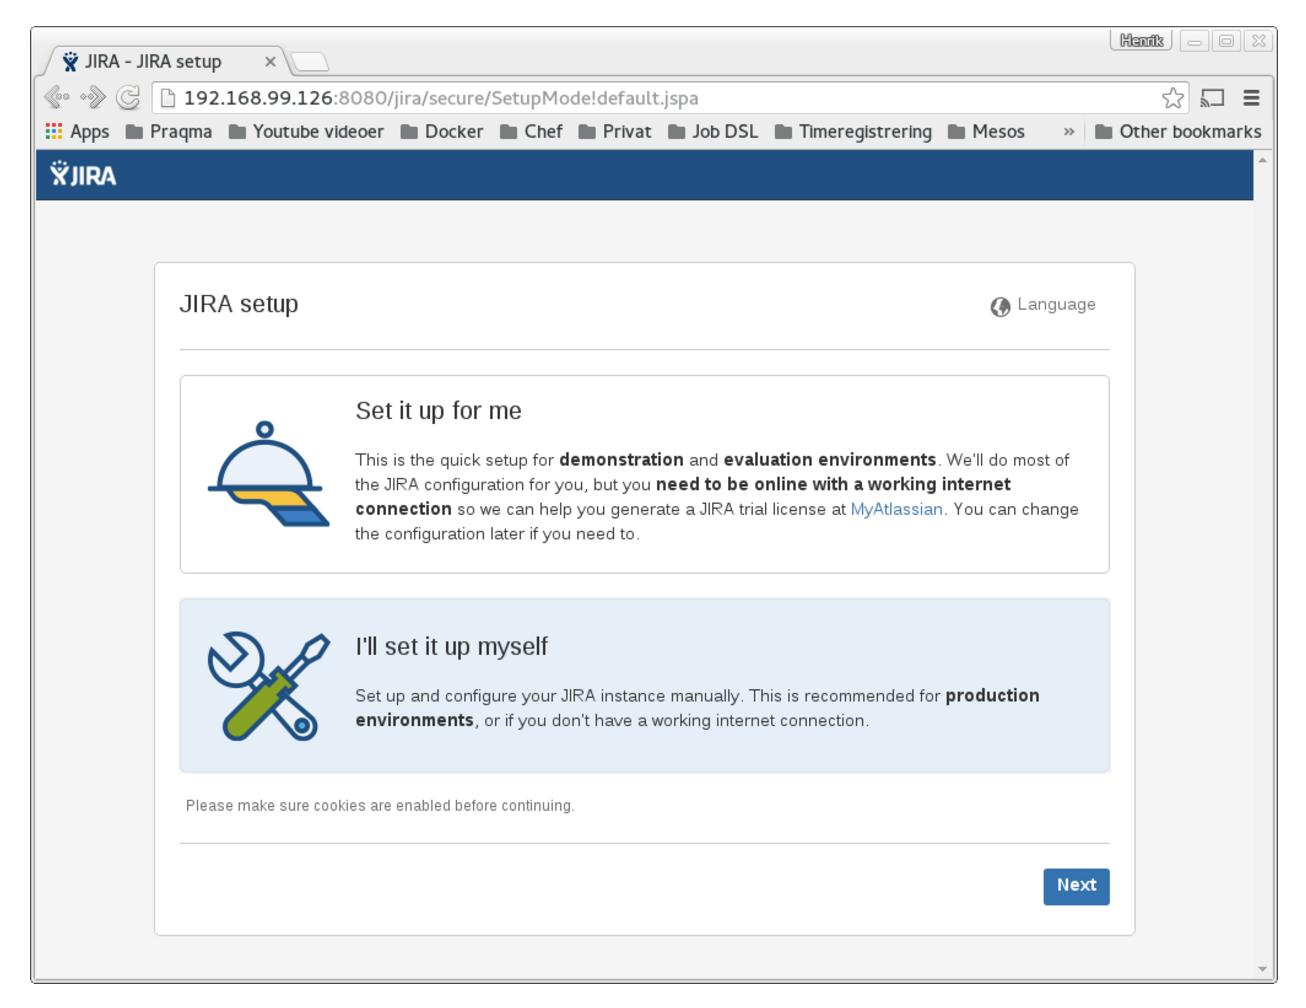
Your Atlassian containers should be up and running now. In the SystemInfo.html you will find links to these. Click on them, and follow the web guide with information from the html file, and you’re done.
Under the hood
In the root of STACI we have a couple of scripts. The install script is the main script that ties together many of the scripts in the ./bin folder. Helper scripts can be found in the ./functions folder. We have a file in $STACI_HOME/functions called dockermachine.f where we keep the functionality related to docker-machine. This is where host machines are created, provider properties fetched, and the swarm cluster created. All images are located in $STACI_HOME/images folder. These are built on the host that runs them. This way we don’t need to pass them to a registry when using a Docker swarm.
In staci.properties you can turn clustering on or off. If set to off, STACI will build and start all containers locally on your machine.

If clustering is turned on, it will use the chosen provider to provision hosts, and then deploy containers there. It will create a host for each application and one for Consul, a service discovering container used for the network between nodes to work.
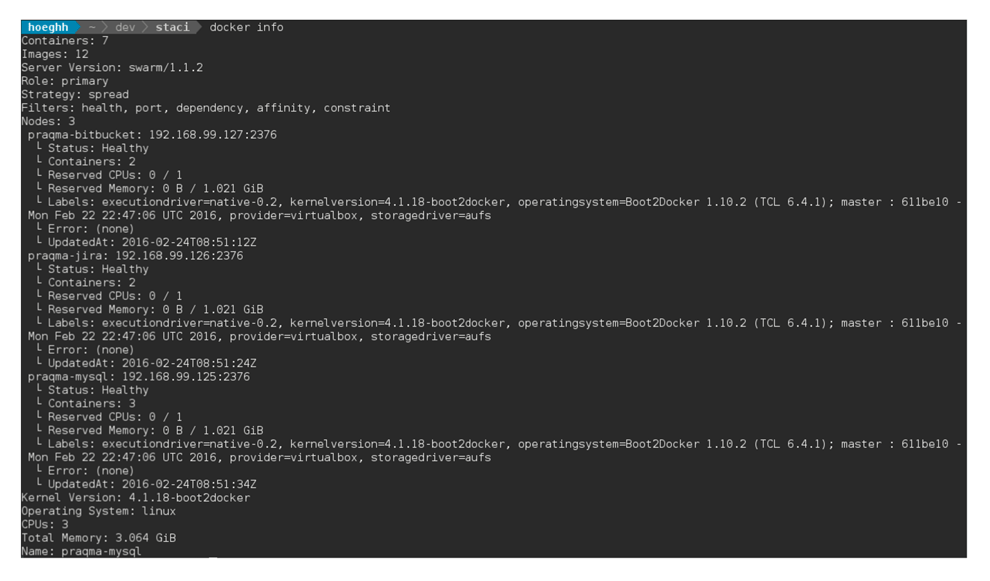
When the swarm is ready, set your environment up by running :
eval $(docker-machine env --swarm praqma-mysql)You will get a docker info which then looks like this :
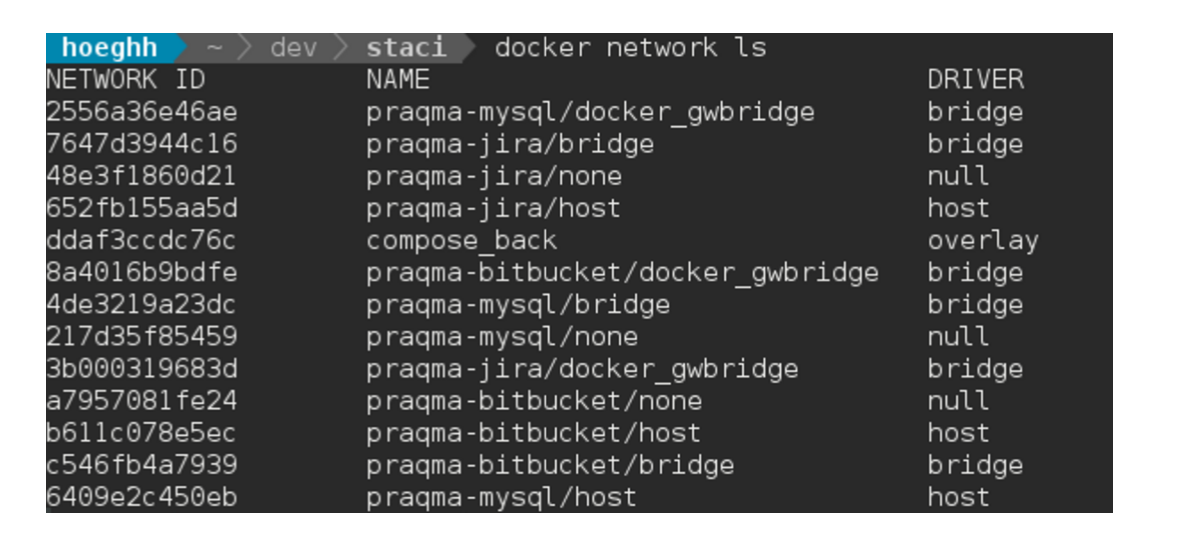
STACI can create these hosts via OpenStack, VirtualBox and VMware vSphere as a provider. We use the overlay network to connect the containers on the nodes.
The install script will create hosts (if not run locally), and build the chosen images with their configuration. These are then started via a generated docker-compose file in $STACI_HOME/compose. This only contains the applications you selected in staci.properties. It then starts a MySQL container and connects to the database, creates all the databases needed, and configures them. This happens via the script $STACI_HOME/bin/init-mysql.sh. Later we would like to support PostgreSQL as well. Therefore,the database image is called atlassiandb, and not mysql when built.
Once the database is configured, it will generate a html file with the information you need when going through the Atlassian setup guides. If you specify your browser in staci.properties then STACI will open the html file, when the stack is running. Each application will have a tab with a link to the running instance, and information about the database connection.

If you would like to change things, like the host names to Atlassian-Jira instead of Praqma-Jira, you can change this - and much more - in the configuration files located in conf/. Also, you can change the usernames, passwords and database names for each application in staci.properties. Take a look, and play around with it.
The future of STACI
STACI is a work in progress and we keep adding new features and configuration. This section lists some of the ideas on the roadmap. We would like to add more providers like DigitalOcean, Google Cloud and AWS. Ideally STACI runs everywhere. Right now you can only specify a single host type and size for all hosts. So the host that runs Jira has the same size as the one running Bitbucket and so on. Different teams have different needs, and so it is desirable to make this configurable. For running the Atlassian stack in production, obviously an HTTPS enabled setup is preferable. This could be handled by adding Apache, nginx or some other HTTPS enabled proxy server, perhaps with auto-generated certificates from Let’s Encrypt. Additionally STACI is entirely ephemeral and needs a proper way to provide persistent storage and backup. How to handle upgrades of the Atlassian products, while STACI is running in production is also an issue that needs to be addressed.
Conclusion
While STACI is not yet production ready, it provides an automated way to run the entire Atlassian stack, without much hassle or manual work. The Docker platform allows STACI to target multiple providers both locally and remote in the cloud. Either way the environment is consistent and reproducible. STACI has allowed us to have a testbed for migrations, upgrades, plugin developer, training and demonstrations. We can simply run a script, and then we are ready to run a large workshop, or provide a potential client with a sandbox environment. As such STACI has already provided a lot of value to us, and our customers.
To try out STACI and get some hands-on experience, visit our repository here:
We also encourage you to create GitHub issues or pull requests for any bugs you encounter or future improvements you would like.
Published:
Updated: