4 practical tips to keep your Artifactory clean and lean
Managing your artifacts is an unexciting but crucial activity. The Ops team installs and operates Artifactory, but due to its unattractiveness, the Dev teams don’t fully embrace it.
Let’s fix that.
In this post you will learn some practical tips and tricks on how to keep your Artifactory organized and cleaned up, so that it does not become a bloated, unmanageable blob.
It all starts well…
Congratulations, you have installed and begun to use your Artifactory. It is new, shiny, and manageable in size. It’s time to get every team on-boarded to utilize the tool to the fullest.
Fast forward a year or more from the first installation and your Artifactory is growing exponentially in size since all teams store all artifacts from all CI builds on it. And who is cleaning up? The answer is: Nobody.
The Ops people don’t know what is stored in Artifactory, and since Devs are not responsible for upgrading the storage, they are not impacted by the pollution.
To illustrate the size of the problem, let’s just make a simple calculation:
Three teams of 8 people commit twice a day, producing 100MB of artifacts per commit for 200 days in a year. This results in almost a terabyte of artifacts per year, and most of it will never be released to customers.
And this is for a small team. Imagine the scale on larger projects.
If you wait too long to implement rules and guidelines, it practically becomes unmanageable. Over time, your Artifactory server gets bloated and hard to maintain in terms of backup and maintenance from the ops side.
So what can you do about it? The next sections are my recommendations on how to get out of this mess.
1. Establish a path of maturity in your pipeline and repositories
JFrog have their best practices on how to denote maturity to your artifacts: through promotion from one repository to another.
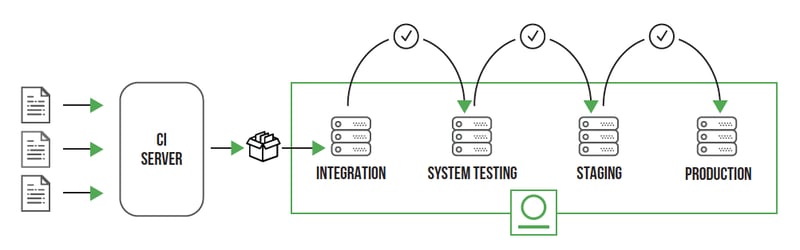
Source: JFrog
I recommend you follow it. It guarantees that you are using the tool the way the inventors intended it to be used. No nasty surprises if they change something that you are using in a custom way.
How many maturity stages you have, depends on your needs. But figure out when the artifact is transferred from team to team, or when an important decision needs to be made to release it to the public. Then you will see more clearly which maturity stages you need.
An example could be the following:
|
Repository maturity /type |
Example name | Retention period* | Comment |
| sandbox | gradle-sandbox-local | 7 days | This is a catch-all repo where all, including individual, developers can upload artifacts. No guarantees are made here about quality. |
| dev | gradle-dev-local | 30 days | The landing place for when the CI system made the artifacts. Further testing is down the pipeline. |
| qa | gradle-qa-local | 60 days | Artifacts stay here when they undergo test. They are on a path to promotion to release, or to be dumped by a quality gate and replaced by a newer version. |
| release | gradle-release-local | never | This is what is released to the public, and should therefore never be deleted automatically. |
* Retention periods should be calculated from the properties “time of upload” and “time of last use”—and only be deleted when both of the durations are exhausted.
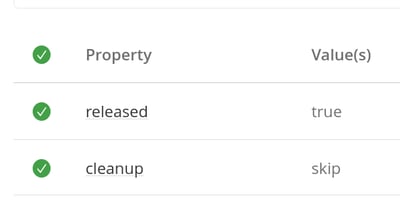
A simpler alternative
Are having multiple repositories perhaps too heavy for you? Then consider using a simple rule of having properties that define the behavior, like cleanup=skip or released=true.
But please note that it becomes cumbersome to change this simple implementation to a more mature one over time. So I strongly recommend that you use maturity repositories, and maybe just stick with one or two, to begin with.
These are the ground rules you need to lay out in your Artifactory, to be able to create rules for cleaning up artifacts afterward.
2. Find the artifacts that need to be cleaned up
First look into the storage summary under the admin and monitoring tab. That will immediately tell you which repositories are using the most storage.
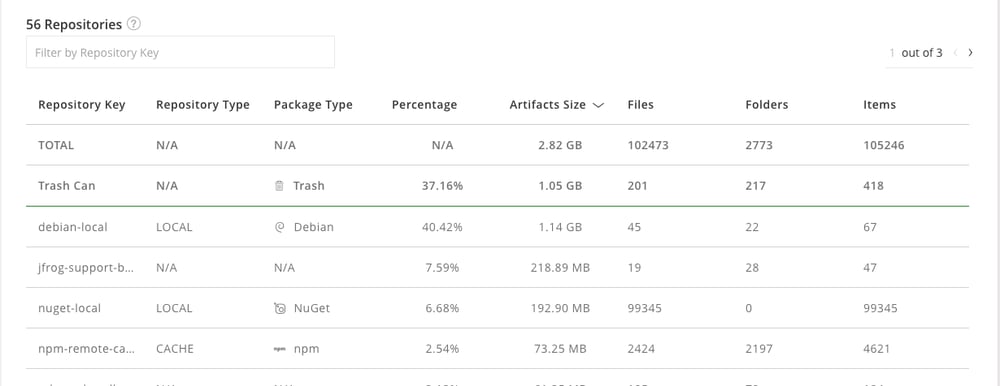
You now have a coarse overview of who are the heaviest users of the system.
That gives you an idea of where to focus if you are going to go repository by repository.
If you are just setting up your repositories, then fantastic, do yourself a favor and apply these “rules” to all repositories in one go.
Now, let’s use the Artifactory Query Language (AQL) to search for the specific artifacts that need to be deleted. AQL is a powerful language that can find artifacts and builds based on your queries.
You can basically find anything through AQL. The model takes its time to get used to but an overview of the data model can be seen below:
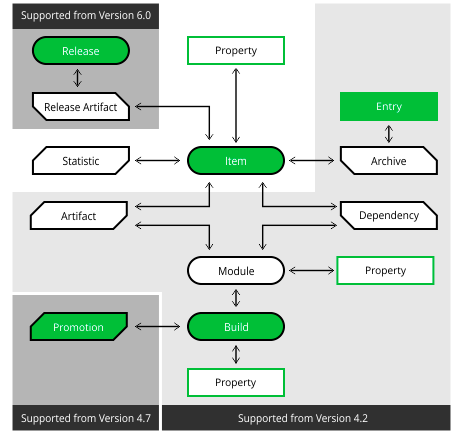
Source: JFrog
Here is an example of how to find all the artifacts that violate our rule for the sandbox repositories:
items.find({
   "repo": { "$match" : "*sandbox*" },
   "$or" :[
      {
         "$and": [
           { "updated": { "$before": "7d" } }
         ]
      }
   ]

})
You will find more examples of this in our Artifactory training repository.
You can execute AQL in many different ways, but the easiest way is by using curl with your authentication and Artifactory URL in environment variables:
curl -i -X POST -H "${AUTH_HEADER}" -H "Content-Type:text/plain" "${ARTIFACTORY_URL}/api/search/aql" -T payload.aql
The response would look like this:
{
   "results" : [{
      "repo" : "sal-gradle-sandbox-local",
      "path" : "acme/frog/2.0.0",
      "name" : "frog-2.0.0.jpg",
      "type" : "file",
      "size" : 2748983,
      "created" : "2023-02-22T12:08:10.824Z",
      "created_by" : "admin",
      "modified" : "2023-02-22T12:08:10.803Z",
      "modified_by" : "admin",
      "updated" : "2023-02-22T12:08:10.824Z"
   }],

}
You can limit the amount of information you get from each artifact, by using the “.include()” method at the end of your AQL.
Their CLI also lets you run AQL queries, but they then need to be wrapped in a filespec format which I find rather unintuitive, to say the least. The CLI does not allow you to specify the “include” part of your query, which limits your searching and filtering capabilities.
With that in place, let’s now look at how to delete the artifacts we have just found.
3. Deleting unused artifacts
There are a plethora of utility tools out there that will help you clean up your artifacts in Artifactory.
That there are so many different ways to do it tells me two things:
- It should have been a thing defined in the core product, to begin with (since 100% of the user base needs it one way or another).
- Deleting artifacts is a delicate matter and people have different needs on how to select what they should and shouldn’t delete.
I will not give you a full list of possible tools, but rather highlight two approaches:
My own Python script
With the fear of realizing the XKCD comic with competing standards, I needed a way for me to create an AQL query, and easily use it for both search and deletion. And since all tools out there either used filespec, or some homemade/limited way of querying, I decided to script it myself.
With this method, you provide the same AQL file as you search with. But instead of only searching for, and outputting the artifacts, you also have the possibility to delete them.
You can either run it as a standalone python script, or as a Docker container.
You will find the repository, with the python script including documentation, on this page.
Artifactory cleanup application
The alternative to my own script above, which I also want to highlight, is the Artifactory cleanup application from crazy-max. (Disclaimer: I do not know the author, and therefore cannot vouch for the security quality of the source code.)
The benefit here is that you do not need to know AQL, but have the most common knobs and dials in their configuration YAML specification.
Now you just need to run this periodically, either as a build job on your CI system, or a cron job on a server (it could even be the Artifactory server itself), and your Artifactory will be automatically and regularly cleaned up.
Give one last hope of retrieval
Now that all the artifacts have been deleted, your Artifactory has a much slimmer future ahead of it. But what if you deleted something that should have been kept for all eternity?
What you essentially want is to make sure you have enabled the trash can (enabled by default), and set the retention period to a reasonable time.
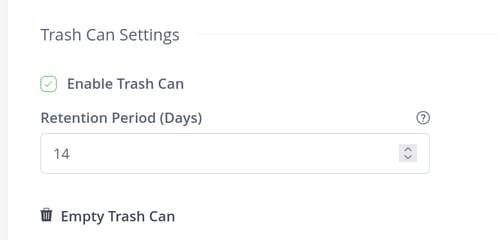
You can set this under the “Artifactory General Settings” tab (as an admin).
This way, there is a slow and manual process to get artifacts back, for whatever time you decide.
If your trash collection frenzy goes too wild, then this knowledge article might help you retrieve your artifacts from a given point in time, instead of one by one.
4. Use the Projects feature to divide and conquer
Once you have done all the above, you may still have one team or part of your organization more disk-demanding than the rest. Sure, they delete things through the ruleset applied to the cleanup process, but what if they make artifacts in the gigabyte size instead of the megabyte?
Then it’s not only a matter of cleaning up. Perhaps you also need to reign them into a fixed amount of disk space they can claim.
To achieve that, you can use the semi-new feature called “Projects”, introduced in Artifactory 7.31.10. With Projects, you can divide the server into "sections", mimicking your project/team structure.
We have used it with some customers with varying results. It's a relatively new feature and it lacks some maturity, especially if you are trying to use this as an alternative to permission targets, and have self-managed teams.
To make matters worse, how many projects you can have is heavily dependent on the license you buy, so it may not be a feature you can rely on for all teams and projects.
Wrapping up
Artifact management is important, needs to be strict in order to work properly, and is quite boring. But by following the tips above, you are getting into a state where most of the tasks are automated and based on rulesets that are generic enough to fit all teams, regardless of their maturity level and needs.
Published:
Updated: